AWS Fargate
Deployed as a sidecar container using a task definition
In AWS Fargate, the ThreatStryker agents are deployed as a sidecar container using a task definition.
The ThreatStryker management console is installed separately outside the fargate and the installation procedure is the same as before.
Currently supported base operating systems of containers are Amazon Linux, Ubuntu, Debian, CentOS and RHEL
Please note the agent image "quay.io/deepfenceio/deepfence_agent:3.8.0-fargate" is different from other deployment methods.
Installing on AWS Fargate
-
Set up AWS ECS by following the steps outlined here: Set up to use AWS ECS
-
Refer Prerequisites for the actions performed in this step. Add the Deepfence Quay secrets provided to AWS secrets manager by following the steps outlined here: Introducing private registry authentication support for AWS Fargate and here: Private registry authentication for tasks
You'll need to perform the following steps:
- Create an AWS ECS task execution IAM role.
- Create a secret so that fargate can pull the Deepfence agents from Quay using the username/password provided in the license email. Note the created secret name or ARN (you will need to enter them in task definition creation step later). You may need to create other secrets to access your own artifacts.
- Create policies (either managed or inlined policy) allowing access to your stored secrets and attach the created policies to the task IAM role. You also need to attach the AmazonECSTaskExecutionRolePolicy to the IAM role to run AWS ECS tasks.
-
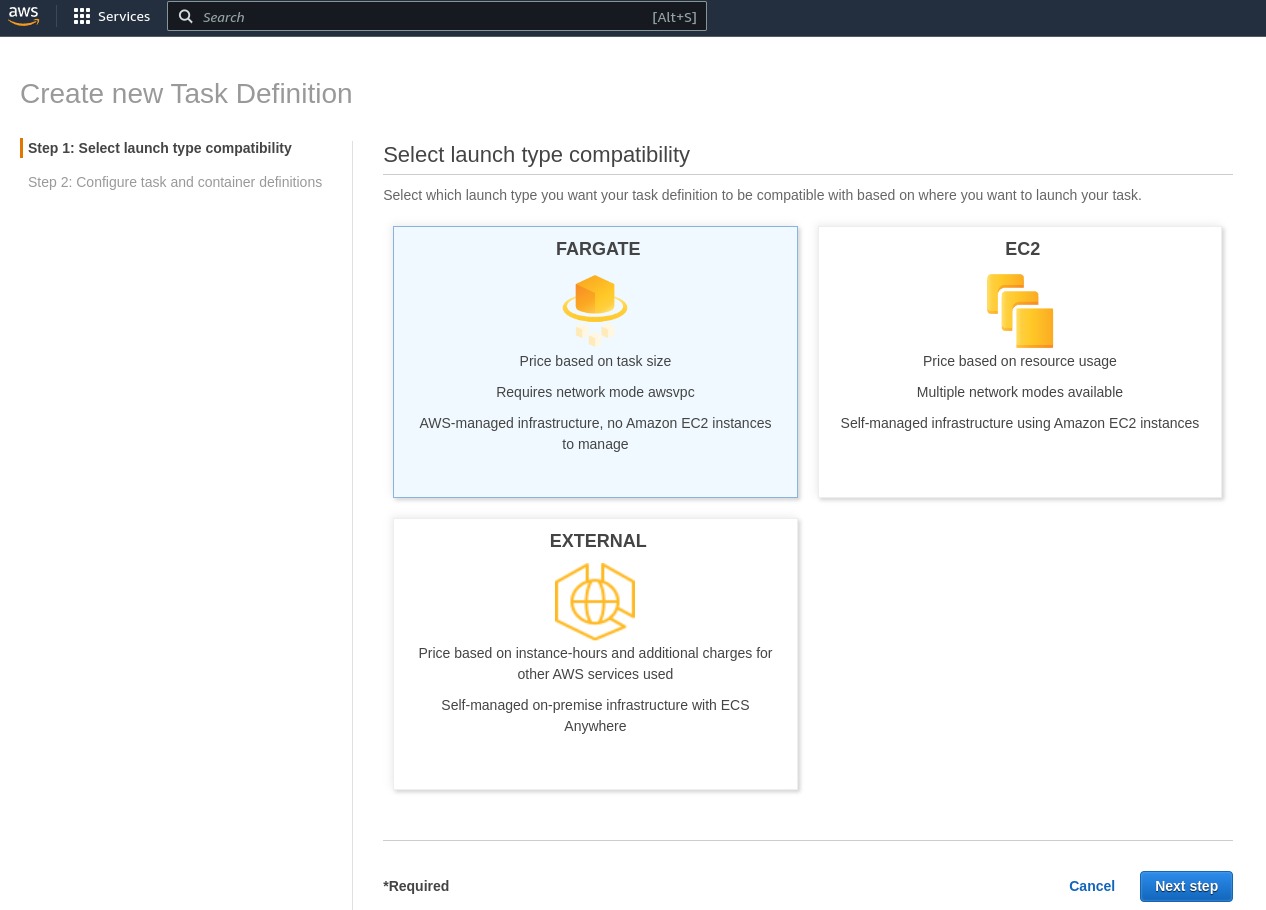
On the AWS ECS home page switch old AWS UI, click on the task definition on the side panel to create a new task definition. Select fargate as launch type and then go to Next step.
Use the following steps outlined below in "Fargate Task definition And Deployment" instructions to deploy the fargate agent.
You can configure the task definition either through JSON or using the AWS UI.
-
Deploy your application on your cluster.
Create New Task Definition in Fargate
Create Task Definition
Click Create new Task Definition and select fargate as launch type and then go to Next step.
 |
|---|
| *New Fargate Task * |
Set Task Parameters
Edit the Task Definition Name, Task Role and Task Execution Role etc. as required. For the Task Role and Task Execution Role, you have to use the role created in IAM role creation step earlier. Specify Task memory and Task CPU according to your Requirements.
 |
|---|
| Update task definition and create agent container |
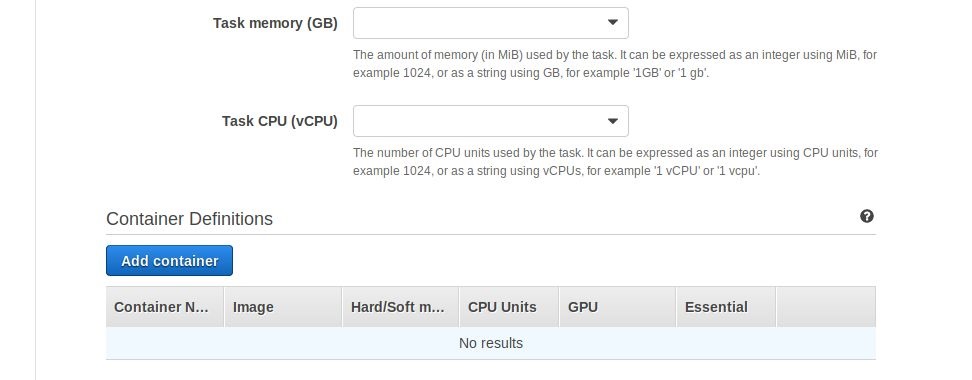
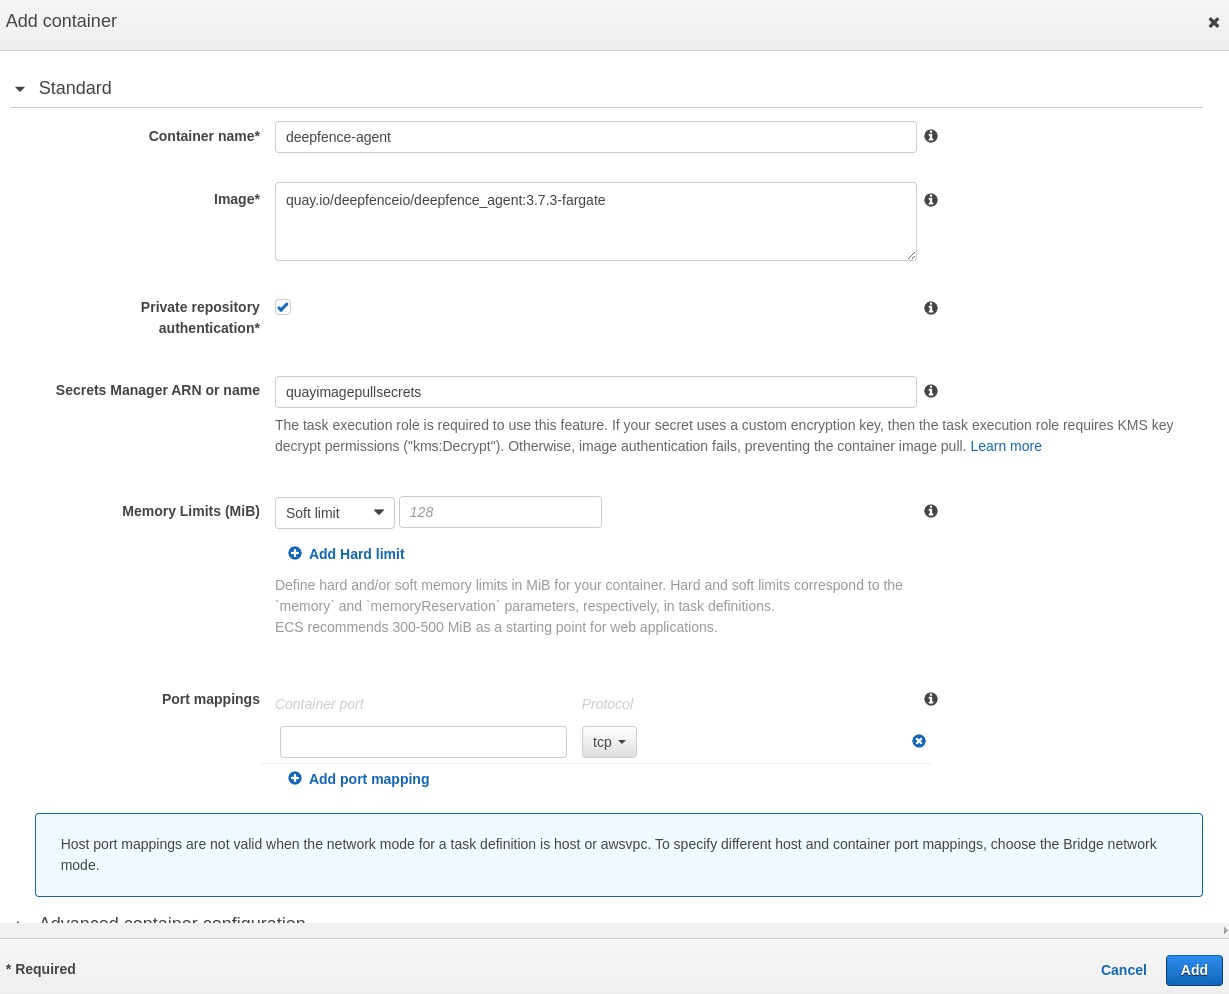
Add the Deepfence Agent Sidecar Container
Click on the Add Container button to create a standard container for the ThreatStryker agent. Set image as quay.io/deepfenceio/deepfence_agent:3.8.0-fargate
Check the private repository authentication and add the secret name or ARN from IAM role creation step to access Deepfence Quay. In the environment section, DO NOT mark it as essential.
You need to note down the name of the agent container (deepfence-agent in our example), which you will have to specify in Volumes From section in application container task definition section later.
Finally, click the Add button to create the deepfence agent container:
 |
|---|
| Create the Sidecar Agent Container inside the Task Definition |
Add the Main Container to your Application
Click on the Add Container button to create a new container for your application by following the additional steps outlined below. If you have more than one application container, you will have to repeat these steps for each container.
Configure Environment Variables for Fargate Application Container
The following environment variables are required for the ThreatStryker agent:
- DEEPFENCE_KEY: API key available in the management console UI(can be stored as a secret and later referred in environment using valuesFrom)
- MGMT_CONSOLE_URL: IP address of Management Console
- DF_SERVERLESS: Set to true for serverless instances
If you are using json to configure your task definitions, you can use the following part in the appropriate container section of task definition json after copying the appropriate IP address and API Key.
"environment": [
    {
        "name": "DEEPFENCE_KEY",
        "value": "<deepfence-key>"
    },
    {
        "name": "MGMT_CONSOLE_URL",
        "value": "<MGMT_CONSOLE_URL>"
    },
    {
        "name": "DF_SERVERLESS",
        "value": "true"
    },
    {
        "name": "DF_FIM_ON",
        "value": "N"
    },
    {
        "name": "DF_TRAFFIC_ANALYSIS_MODE",
        "value": "all"
    },
    {
        "name": "DEFENDERD_DISABLE_XFF_PROTECTION",
        "value": "false"
    },
    {
        "name": "DEFENDERD_TCP_BUFFER_LIMIT",
        "value": "500MB"
    },
    {
        "name": "DF_TRAFFIC_ANALYSIS_ON",
        "value": "Y"
    },
    {
        "name": "USER_DEFINED_TAGS",
        "value": ""
    },
    {
        "name": "DF_INSTALL_DIR",
        "value": "/path/to/custom/install/dir"
    }
]
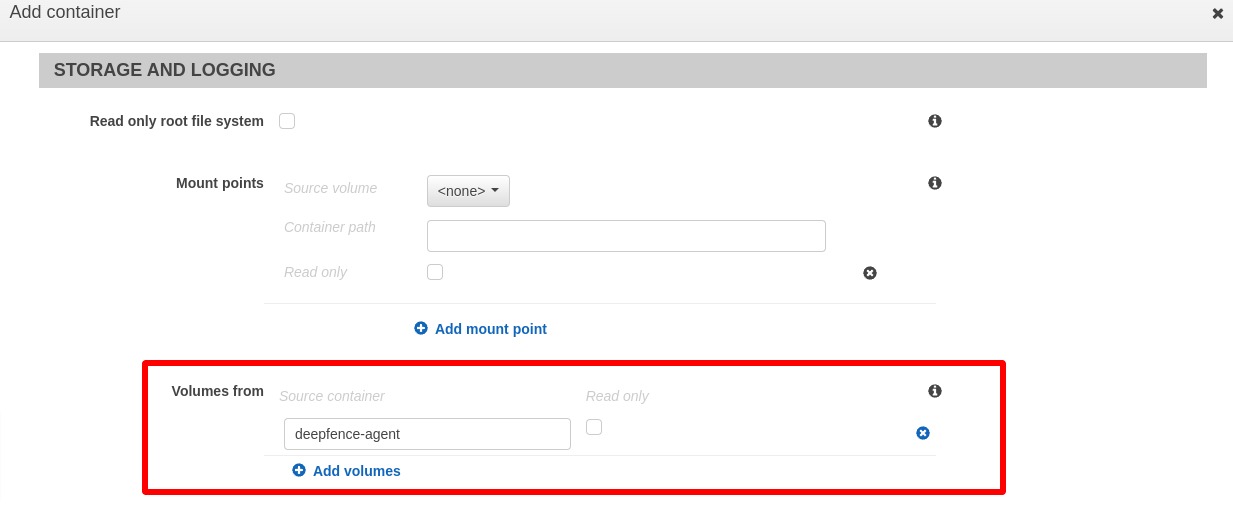
Configure Storage
In the application container, update storage to allow read/write from deepfence agent volume by specifying the agent container name in volumes from. Leave the Read only button unchecked as shown below.
 |
|---|
| Configure VolumesFrom Setting |
If you are using json to configure your task definitions, you can copy the following settings to the appropriate container section of the json after changing the Container name:
"volumesFrom": [
   {
       "sourceContainer": "deepfence-agent",
       "readOnly": false
   }
],
Finally, click the Create button to create the task definition for the deployment.
Configure Correct Startup
Now that deepfence agent is available in the fargate instance, you need to invoke agent and application entrypoints to start the application with Deepfence enabled. This can be done in two ways:
Option 1: Edit the Entry Point for the container
The second option does not require any change in the application container. You can run the same image seamlessly on a VM, EC2 instance, or a fargate instance. There are two ways to achieve this:
Change the Entrypoint: For this, you need to provide the ThreatStryker entrypoint and the Application entrypoint and arguments, as a comma delimited list in the Entry point field:
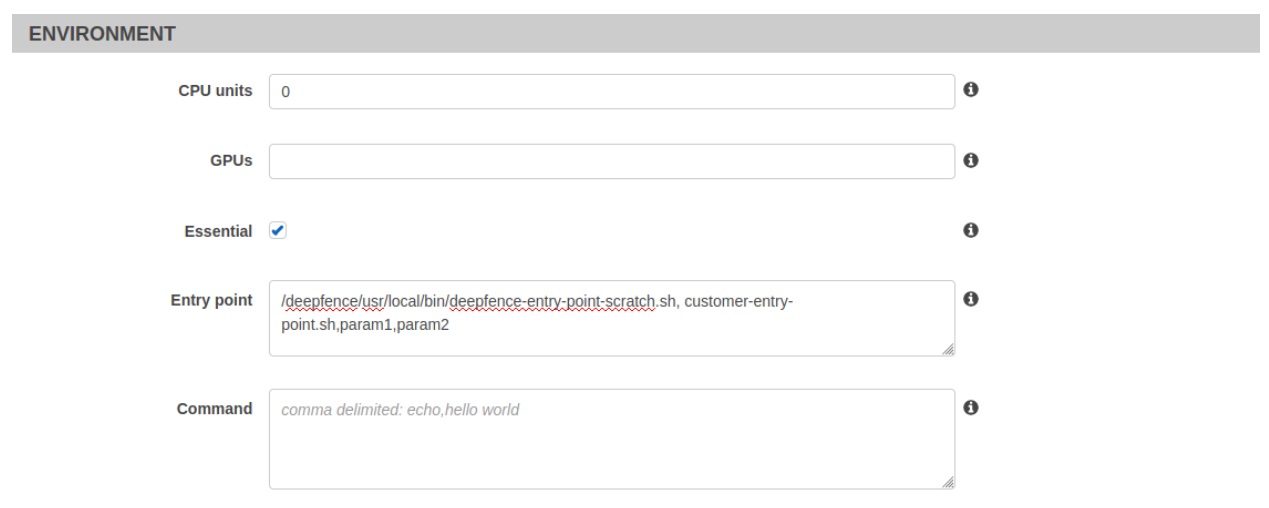 |
|---|
| Method (1a): Invoking agent by changing the Entrypoint |
If you are using json to configure your task definitions, then you can specify the entrypoint and/or command as follows using appropriate quoting:
"entryPoint": [
   "/deepfence/usr/local/bin/deepfence-entry-point-scratch.sh",
   "customer-entry-point.sh",
   "param1",
   "param2"
]
Change the Entrypoint and Command: Alternatively, you can provide the ThreatStryker entrypoint in the Entry point field and the Application entrypoint and arguments in the Command field as shown below:
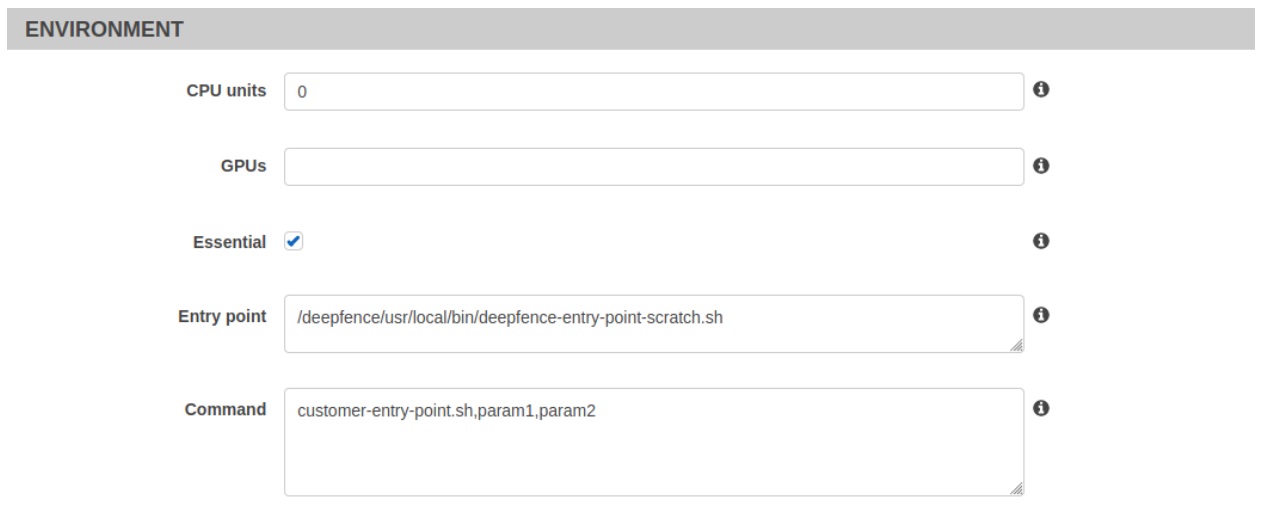 |
|---|
| Method (1b): Invoking agent by changing the Entrypoint and Command field |
If you are using json to configure your task definitions, then you can specify the entrypoint and/or command as follows using appropriate quoting:
"entryPoint": [
   "/deepfence/usr/local/bin/deepfence-entry-point-scratch.sh"
],
"command": [
   "customer-entry-point.sh",
   "param1",
   "param2"
]
Option 2: Change Application Container Image
The first option requires that you can change the application container image. Before building your application containers for deployment, add a call to start Deepfence entrypoint at the beginning of application entrypoint (or at any point before starting your application) as shown in the following example script.
Note that the fargate instance will stop if any of the essential containers exit, so the user application container has to be written accordingly.
#!/bin/bash -x

echo "Start Deepfence services... Console is $MGMT_CONSOLE_URL"
/deepfence/usr/local/bin/deepfence-entry-point-scratch.sh

############################################################
# Start the customer application entry point below...
############################################################

echo "Starting the customer application entry point below..."
#cust-entry-point.sh "$@"

echo "Block to avoid customer application container from exiting fargate."
/deepfence/usr/local/bin/block-scratch.sh
echo "customer entry-point is exiting...."
Deploy ThreatStryker Agent Service on Fargate
After creating your updated application containers and the task definitions, you can launch your fargate instance in your cluster.
You can launch your fargate instance by clicking Run task in the actions dropdown of the task definition. Otherwise, you can click “Run New Task” button in “Tasks” tab of your cluster:
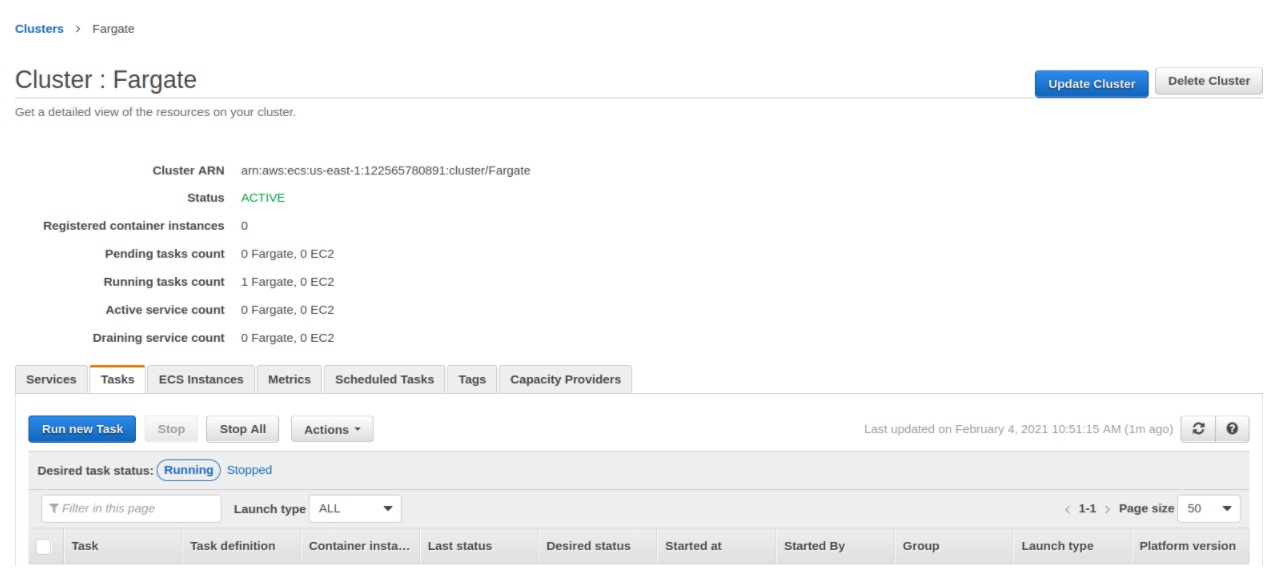 |
|---|
| Deploying fargate instance on your cluster |
Select Fargate as the launch type and choose appropriate task definition, cluster, number of tasks, VPC and security groups before launching the task. Fargate agents should be able to access ports 8000–8010 on console, so users need to make sure that security groups allow these outbound connections and other connections as needed.
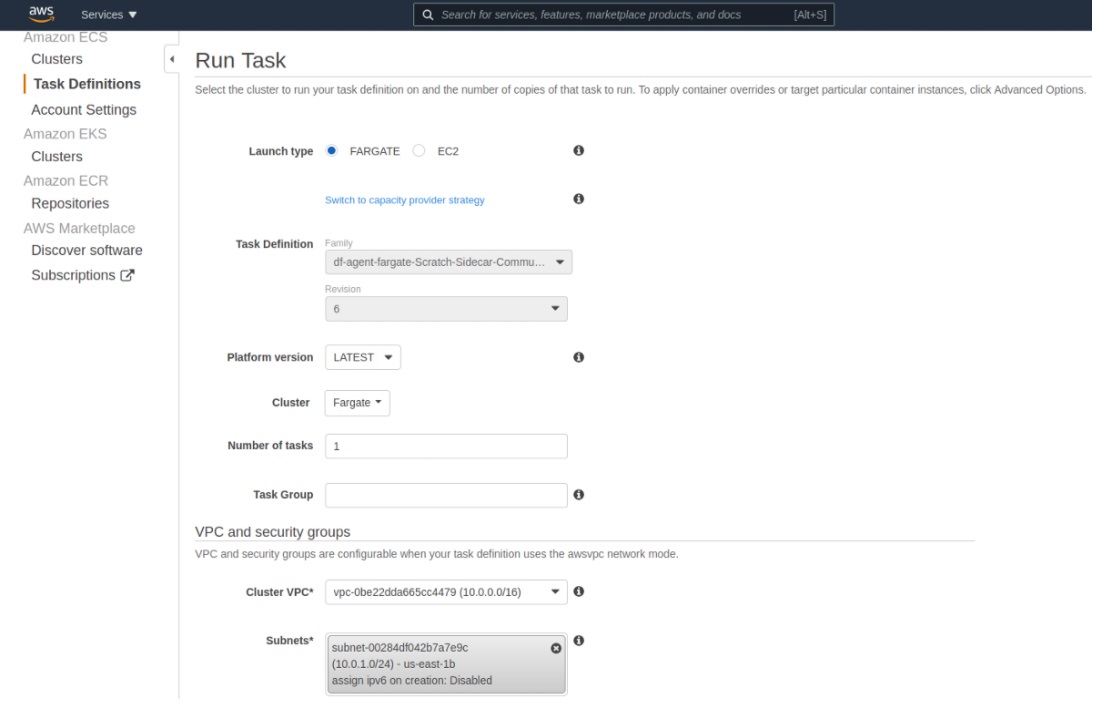 |
|---|
| Run the fargate task on your cluster |
Finally, click the “Run Task” button.
Prerequisites
Make sure you have the following information:
- Quay login, later referred as
<QUAY_LOGIN> - Quay password, later referred as
<QUAY_PASSWORD> - Management console URL/IP, later referred as
<MGMT_CONSOLE_URL> - Deepfence API key, later referred as
<DEEPFENCE_KEY>(This key can be found from the management console, in the settings > User > API Key)
- Add secret for quay.io registry login
- Go to the secret manager dashboard from the AWS Console
- Select "Store a new secret"
- Select "Other type of secret"
- Select "Plaintext" and paste the following:
{
    "username" : "<QUAY_LOGIN>",
    "password" : "<QUAY_PASSWORD>"
}
Create the secret and store the ARN. We will refer to it as <ARN_QUAY_CREDS>
- Add secret for Deepfence API key
- Go to the secret manager dashboard from the AWS Console
- Select "Store a new secret"
- Select "Other type of secret"
- Select "Plaintext" and paste the following:
{
    "deepfence_api_key" : "<DEEPFENCE_KEY>"
}
Create the secret and store the ARN. We will refer to it as <API_KEY_SECRET_ARN>
Be careful with the double quotes, sometimes the AWS UI transforms them into a special character that is not recognized as valid JSON.
- Create a new role (e.g.:
deepfence-agent-role)- Go to the IAM dashboard from AWS Console
- Go to Access management > roles
- Select "Create Role",
- Select "Custom trust policy"
- Paste the following:
{
    "Version": "2012-10-17",
    "Statement": [
        {
            "Effect": "Allow",
            "Principal": {
                "Service": "ecs-tasks.amazonaws.com"
            },
            "Action": "sts:AssumeRole"
        }
    ]
}
Then continue:
-
Search in the "Permissions policies" for "Task" > Select the following policy:
AmazonECSTaskExecutionRolePolicy -
Again search in the "Permissions policies" for "Task" > Select the following policy:
CloudWatchLogsFullAccess -
Click "Next", name the role
deepfence-agent-role, then "Create role" -
Store the Role ARN. We will refer to it as
<AGENT_TASK_ROLE_ARN> -
Search for your newly created role
-
Click on it (
deepfence-agent-rolein our example) -
Select "Add permissions" > "Create inline policy" and add:
{
    "Version": "2012-10-17",
    "Statement": [
        {
            "Effect": "Allow",
            "Action": [
                "secretsmanager:GetSecretValue"
            ],
            "Resource": [
                "<ARN_QUAY_CREDS>",
                "<API_KEY_SECRET_ARN>"
            ]
        }
    ]
} -
If you are using a custom KMS key for your secrets and not using the default key, you will also need to add the KMS key permissions to your inline policy:
{
    "Version": "2012-10-17",
    "Statement": [
        {
            "Effect": "Allow",
            "Action": [
                "kms:Decrypt",
                "secretsmanager:GetSecretValue"
            ],
            "Resource": [
                "<ARN_QUAY_CREDS>",
                "<API_KEY_SECRET_ARN>",
                "<custom_kms_key_arn>"
            ]
        }
    ]
}
Then create the new policy.
Sample fargate task definition json with deepfence-agent sidecar
{
    "requiresCompatibilities": [
        "FARGATE"
    ],
    "inferenceAccelerators": [],
    "containerDefinitions": [
        {
            "name": "python",
            "image": "python:latest",
            "cpu": 0,
            "portMappings": [
                {
                    "name": "python-8000-tcp",
                    "containerPort": 8000,
                    "hostPort": 8000,
                    "protocol": "tcp"
                }
            ],
            "essential": true,
            "entryPoint": [
                "/deepfence/usr/local/bin/deepfence-entry-point-scratch.sh"
            ],
            "command": [
                "python3",
                "-m",
                "http.server"
            ],
            "environment": [
                {
                    "name": "MGMT_CONSOLE_URL",
                    "value": "<MGMT_CONSOLE_URL>"
                },
                {
                    "name": "DF_SERVERLESS",
                    "value": "true"
                },
                {
                    "name": "DF_FIM_ON",
                    "value": "N"
                },
                {
                    "name": "DF_TRAFFIC_ANALYSIS_MODE",
                    "value": "all"
                },
                {
                    "name": "DEFENDERD_DISABLE_XFF_PROTECTION",
                    "value": "false"
                },
                {
                    "name": "DEFENDERD_TCP_BUFFER_LIMIT",
                    "value": "500MB"
                },
                {
                    "name": "DF_TRAFFIC_ANALYSIS_ON",
                    "value": "Y"
                },
                {
                    "name": "USER_DEFINED_TAGS",
                    "value": ""
                },
                {
                    "name": "DF_INSTALL_DIR",
                    "value": "/usr/local/bin"
                }
            ],
            "mountPoints": [],
            "volumesFrom": [
                {
                    "sourceContainer": "deepfence-agent",
                    "readOnly": false
                }
            ],
            "secrets": [
                {
                    "name": "DEEPFENCE_KEY",
                    "valueFrom": "<API_KEY_SECRET_ARN>:deepfence_api_key::"
                }
            ],
            "logConfiguration": {
                "logDriver": "awslogs",
                "options": {
                    "awslogs-create-group": "true",
                    "awslogs-group": "/ecs/test-doc-python",
                    "awslogs-region": "us-west-2",
                    "awslogs-stream-prefix": "ecs"
                }
            }
        },
        {
            "name": "deepfence-agent",
            "image": "quay.io/deepfenceio/deepfence_agent:3.8.0-fargate",
            "repositoryCredentials": {
                "credentialsParameter": "<ARN_QUAY_CREDS>"
            },
            "cpu": 0,
            "portMappings": [],
            "essential": false,
            "environment": [],
            "mountPoints": [],
            "volumesFrom": [],
            "logConfiguration": {
                "logDriver": "awslogs",
                "options": {
                    "awslogs-create-group": "true",
                    "awslogs-group": "/ecs/test-doc-python",
                    "awslogs-region": "us-west-2",
                    "awslogs-stream-prefix": "ecs"
                }
            }
        }
    ],
    "volumes": [],
    "networkMode": "awsvpc",
    "memory": "4096",
    "cpu": "2048",
    "family": "test-doc-python",
    "executionRoleArn": "<AGENT_TASK_ROLE_ARN>",
    "taskRoleArn": "<AGENT_TASK_ROLE_ARN>",
    "runtimePlatform": {
        "cpuArchitecture": "X86_64",
        "operatingSystemFamily": "LINUX"
    },
    "tags": [],
    "placementConstraints": []
}